Wednesday 25 July 2012

WEEK 4 - 3rd Day ( 18 JULY 2012 )

Assalamualaikum and Salam Satu Malaysia.

For today, we trying to lab session 6 ( Embedded system ) for interrupt and timer. 

Objective:

  1. To use interrupt to produce clock timing.
  2. To write a  system code in C to display clock on LCD.
  3. To produce a response output on LCD display triggered by the time set by the system clock.
Fort this part is using Interrupt in C programming :

  • Type the program code.
  • The program is written with 2 kinds of error which are syntax error and logical error. Troubleshoot and solve them.
  • Simulate your program using Proteus by drawing circuit in Apendix A and describe the output of the program.
  • Compile the program and load the program into PIC using Win pic 800 software.
  • Using the LCD datasheet, and LCD port number from the flex_lcd.c file connect the jumper setting of the LCD with the PIC port.

WEEK 4 - 2nd Day (17 JULY 2012 )

Assalamualaikum and Salam satu Malaysia.


Today , we lwarning about Program CCS.

AT ----> OK---> AT+CMGF=1 ---> OK----> ATE O ---> OK ---> AT +CMGS +CTRL.Z


C Programming CCS


  • Why use C programming CCS ----> portable language
  • Preprocessor directive ----> #include <16f877.ah>                                                                          
                                                                 #use delay < clock=2000000>
  • Main program ----> void main -->intterupt --> main program
                                    ----->set_trisc_c
  • Loop statement
  • #include --> header file c with.h extension
                           --> angle bracket "<"and">" indicate the compiler to look for predefined include file directories.
                          --> without angle --> "myfile.h"

  • Escape squence --> " to display"\"blackspalsh
  • \'to display' single quate

Sunday 22 July 2012

WEEK 4 - 1st Day (15 July 2012 )

Assalamualaikum and Salam satu Malaysia.

Today we learn about PIC complier.

Why use C ?
  • Portable language intended to have minimal modification when transferring to another uC.
  • Easier to understand.
  • Efficiency not efficient for small basic program but very efficient for complicated program.
Basic C structure for PIC

Pro processor directives :

  • calling associated files
  • setting the oscillator files
  • fuse setting for microcontroller
  • function declaration
Main program :

  •  This is where your main program code is written
  • Every program must have a main function
  • Appear only once in a Program
  • May use " void " to indicated that  it does not return any value
  • Classed as a function
Function :

  • The function are the subroutines written to perform certain task and may be called more then once.

WEEK 3 - 5th Day ( 13 July 2012 )

Assalamualaikum and Salam satu Malaysia

From my last task in previous day, Mr Mazran told us understand  about AT command in GSM Modem. So today me,we must stydying about PIC command. Before it, we must installing PIC Complier V4.038. For PIC complier we can see example at tutorial folder. then we been though by Azlan about basic of this software and type of PIC.

Thursday 12 July 2012

WEEK 3- 4th Day ( 12 July 2012 )

Assalamualaikum and Salam Satu MALAYSIA.


 From my last task in previous day, today we continue 'Receiving SMS'.


Receiving SMS.
1. Set up the GSM Modem following step 1 – 6 in the previous section.
2. Once the GSM Modem is ready, we can use a mobile phone to send a SMS to the modem.
3. The following response received from the modem indicates a new SMS is received.

+CMTI: "SM", 1

The last character indicates the memory index number, we use this index to read or delete this message. In this case, the index number is 1.


4. To list out all the available SMS in the SIM card, we can use the following command:

AT + CMGL = "ALL" <ENTER>

5. And the modem will respond with a list of SMS messages in the SIM card.


List SMS message in Sim Card

6. DONE !


WEEK 3 - 3rd Day ( 11 July 2012 )

Assalamualaikum and Salam satu Malaysia.


From my last task in previous day, Mr Mazran told us understand  about AT command in GSM Modem. So today me, Syuhada and also Fauzan  have given GSM Modem to us to try it out.The tasks are sending SMS and receive SMS. 

GSM modem is specialized type of modem that operates over subscription based wireless networks which is similar to a mobile phone. A GSM modem accepts a SIM card, and basically acts like a mobile phone for the computer. Traditional modem is attached to computers for ‘dial-up’ to connect with other computer systems. A GSM modem operates in a similar fashion, except that it sends and receives data through radio waves rather than a telephone line.

 Sending SMS
1. Insert a valid SIM card from any mobile provider into the SIM slot.
2. Connect the GSM Modem to the supplied AC-DC adapter and also to the serial port of the   PC.
 3. Select the correct COM Port in Hyper Terminal and set up the parameters as follows:


4. Power on the GSM Modem and wait for it to initialize. While waiting, we can use the following command to make sure we can communicate with the GSM Modem.


AT <ENTER>

The GSM Modem should respond with “OK”.

5. Once it’s ready, the following response will be received from the modem.

Call Ready

6. Now we can start sending the AT command to the GSM Modem. Start by configure the modem to use Text Mode instead of PDU mode for the SMS. This mode allows us to send SMS using AT commands without the need to encode the binary PDU field of the SMS. Use the following command to put the modem in text mode and it should respond with “OK”.

AT + CGMF = 1 <ENTER>


7. After that, we can send the SMS message with the following command:-

AT + CGMS " 0135219644" <ENTER>

8. Replace the above phone number with your own number. The modem will respond with:-

<


9. We can now type the message and send the message using the <CTRL+Z> key.


TEST <CTRL + Z>

10. After few seconds, the modem will respond with the message ID of the message, indicating that the message has been sent correctly.


+CMGS:49


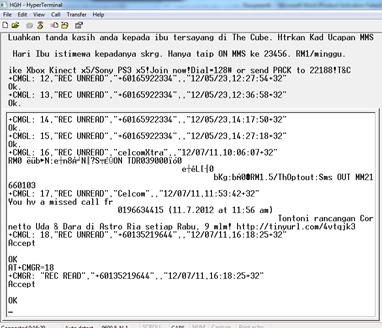
AT Commands to send a SMS

11.  Text that receive from mobile phone. DONE !


WEEK 3 - 2nd Day ( 10 JULY 2012 )

Assalamualaikum and Salam 1 Malaysia.


Around 9.00 am, my senses are at work. As usual I will continue to complete tasks assigned and connect back up the components in the circuit. For a completed assembling the components, PIC  board will be tested to ensure that each component can work properly. After finish my work then the next flow is to test the circuit were it is functioned or not. The tester equipment is vibration sensor and LCD display.


This figure show that the way to test the PCB and The LCD display will display the result. In the afternoon, Mr. Mazran give assignments to make sure that I and  several friends who understand AT command. Further activities will be resumed tomorrow.


The page are about the introducing the GSM Modem, and about control and monitor via SMS.


Tuesday 10 July 2012

WEEK 3 - 1st Day ( 9 JULY 2012 )

Assalamualaikum and Salam 1 Malaysia.


Around 9.00 am, I arrive at work. Today I will do the connecting components in the circuit. For to completed assembling the components, PIC  board will be tested to ensure that each component can work properly.

The board that was installed components

On the page before, I do not give a clear picture of some of the equipment needed. So here I show the equipment needed  during the process of assembling the components in the pic board. 

Solder
Sucker
 components to be installed on board
Feet for solder iron, and wet sponge to clean the tip of solder iron

My work not completed today and continue tomorrow. 


WEEK 3 - 1st Day in UTeM Holding

Assalamualaikum.

Salam 1 Malaysia.

         The first day of practice in UTeM holdings in the hope of gaining as much knowledge and learning in the world of electronic engineering. 

           This is a table where students are asked to follow the practical task which is laid out by advisers in the hope that we get a lot better electronic engineering.

TASK
MEMBER
DURATION
MICROCONTROLLER
        ·         PCB/soldering
        ·         Sensor-vibrator and solar
        ·         Solar + switching
        ·         GSM MODEM

Parallel


WEEK 1 – WEEK 4
BENE
PLC
        ·         AC/DC, Relay
        ·         GSM MODEL

Prerequisite
Week 3
BENT
Week 5
IP CAMERA 
BENT
          2 person each camera *offline(wifi)


MECHANICAL PROTOTYPE
PIC/PLC


General Task:
VISUAL BASIC 2010 - WEEK 5

Specific Task:
WEBSITE TEAM

TIMETABLE PRACTICAL ON HIIS EVERYDAY:
9.00AM
In
9.00AM-10.00AM
Report Blog
10.00AM - 12.30PM
Daily Chores
1.00PM-2.00PM
Break
2.00PM-5.00PM
Daily Chores
5.00PM
Dismissed